FrontISTR / Getting Started
ਸ਼ੁਰੂਆਤ
FrontISTR ਨਾਲ ਇੱਕ ਕਬਜ਼ੇ ਦਾ ਵਿਸ਼ਲੇਸ਼ਣ ਚਲਾਓ ਅਤੇ ਫਿਰ ParaView ਵਿੱਚ ਤਣਾਅ ਦੀ ਵੰਡ ਵੇਖੋ। ਸਾਲਵਰ ਅਤੇ ਤਿਆਰ example ਹੋਣ ਨਾਲ ਪਹਿਲੀ ਵਾਰ ਲਈ mesh ਬਣਾਉਣ ਤੋਂ ਸ਼ੁਰੂ ਕਰਨ ਦੀ ਲੋੜ ਨਹੀਂ ਹੈ।
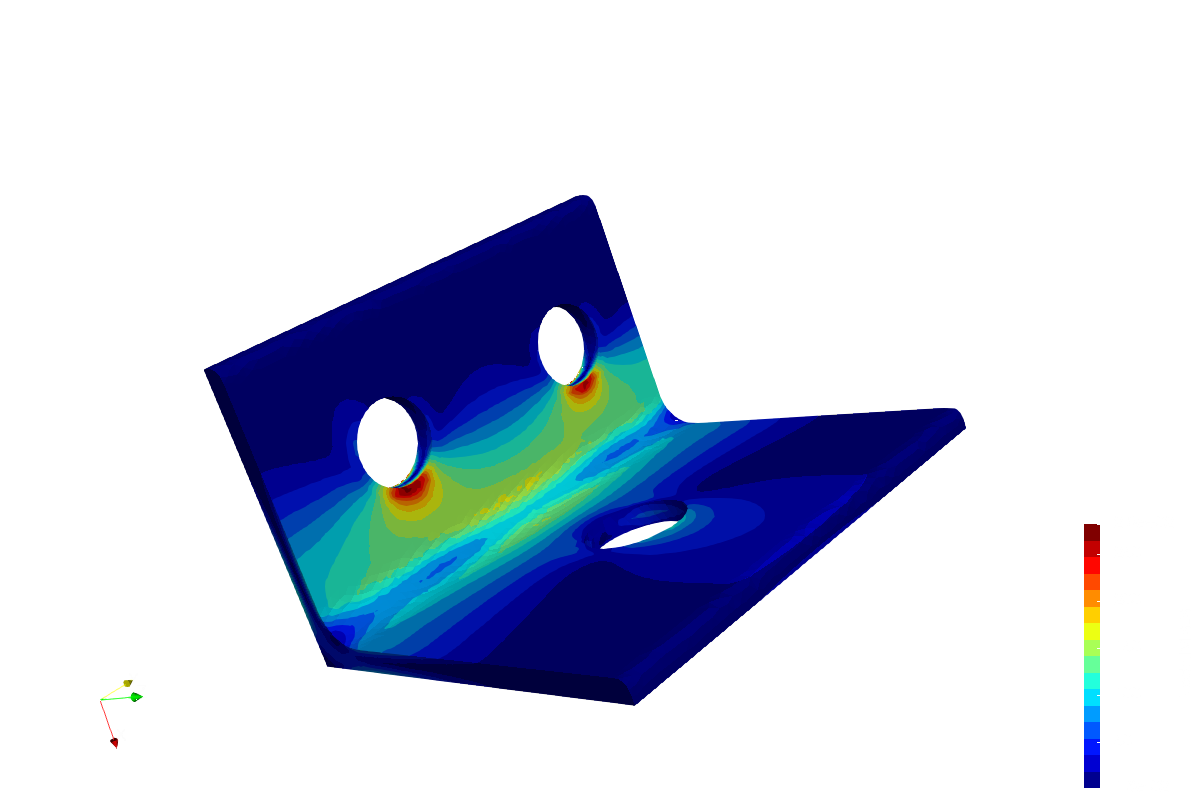
01
solver ਤਿਆਰ ਕਰੋ
Windows binary ਜਾਂ Windows, macOS ਅਤੇ Linux ਉੱਤੇ ਵਰਤੀ ਜਾ ਸਕਣ ਵਾਲੀ Docker image ਤਿਆਰ ਕਰੋ।
Windows (64-bit)
ZIP extract ਕਰੋ। ਅਗਲੇ ਕਦਮ ਵਿੱਚ example ਤਿਆਰ ਕਰਨ ਤੋਂ ਬਾਅਦ fistr1.exe ਅਤੇ ਨਾਲ ਦਿੱਤੀਆਂ ਸਾਰੀਆਂ DLL example folder (01_elastic_hinge) ਵਿੱਚ copy ਕਰੋ।
Docker (Windows / macOS / Linux)
Docker ਸ਼ੁਰੂ ਕਰੋ ਅਤੇ terminal ਵਿੱਚ ਹੇਠਾਂ ਦਿੱਤਾ command ਚਲਾਓ। Windows ਉੱਤੇ Docker ਨੂੰ Linux container mode ਵਿੱਚ ਵਰਤੋ ਅਤੇ command PowerShell ਵਿੱਚ ਚਲਾਓ।
docker pull --platform linux/amd64 registry.gitlab.com/frontistr-commons/frontistr/fistr1:masterਮੌਜੂਦਾ ਅਧਿਕਾਰਤ image amd64 ਲਈ build ਕੀਤੀ ਗਈ ਹੈ। Apple Silicon Mac ਉੱਤੇ ਇਹ emulation ਰਾਹੀਂ ਚਲਦੀ ਹੈ, ਇਸ ਲਈ ਵਧੇਰੇ ਸਮਾਂ ਲੱਗ ਸਕਦਾ ਹੈ।
source ਤੋਂ build ਕਰੋ
ਇਨ੍ਹਾਂ ਵਿੱਚੋਂ ਕਿਸੇ ਵੀ operating system ਉੱਤੇ source code ਤੋਂ FrontISTR build ਕੀਤਾ ਜਾ ਸਕਦਾ ਹੈ। compiler ਅਤੇ ਲੋੜੀਂਦੀਆਂ library install ਕਰਨ ਤੋਂ ਬਾਅਦ CMake environment ਪਛਾਣ ਕੇ build configure ਕਰਦਾ ਹੈ।
ਆਪਣੀ distribution ਮੁਤਾਬਕ ਹੇਠਾਂ ਦਿੱਤੇ command ਨਾਲ ਮੁੱਢਲੇ tools install ਕਰੋ। ਮੌਜੂਦਾ development environment ਵਰਤ ਕੇ MPI ਜਾਂ ਹੋਰ optional library ਜੋੜੇ ਬਿਨਾਂ ਸ਼ੁਰੂ ਕੀਤਾ ਜਾ ਸਕਦਾ ਹੈ।
Ubuntu / Debian
sudo apt-get update
sudo apt-get install build-essential cmake git gfortran
RHEL / Rocky Linux / AlmaLinux
sudo dnf install gcc gcc-c++ gcc-gfortran make cmake gitਹੇਠਾਂ ਦਿੱਤੇ command macOS ਅਤੇ Linux ਉੱਤੇ build ਅਤੇ install ਕਰਨ ਦੀ ਉਦਾਹਰਨ ਹਨ। executable ਤੁਹਾਡੀ home directory ਦੇ bin ਵਿੱਚ ਜਾਂਦੇ ਹਨ, ਇਸ ਲਈ sudo ਜਾਂ PATH ਬਦਲਣ ਦੀ ਲੋੜ ਨਹੀਂ ਹੈ। macOS/Windows setup ਅਤੇ optional library ਲਈ build guide ਵੇਖੋ।
git clone https://gitlab.com/FrontISTR-Commons/FrontISTR.git
cd FrontISTR
cmake -S . -B build -DCMAKE_BUILD_TYPE=Release -DCMAKE_INSTALL_PREFIX="$HOME"
cmake --build build --parallel
cmake --install build
ਨਾਲ ਦਿੱਤਾ example ਮੁੜ download ਕੀਤੇ ਬਿਨਾਂ ਸਿੱਧਾ ਚਲਾਇਆ ਜਾ ਸਕਦਾ ਹੈ। ਹੇਠਾਂ ਦਿੱਤੇ command ਨਾਲ analysis ਚਲਾਓ ਅਤੇ ਫਿਰ ParaView ਵਿੱਚ result ਵੇਖਣ ਲਈ step 04 ਉੱਤੇ ਜਾਓ।
cd tutorial/01_elastic_hinge
"$HOME/bin/fistr1"Binary ਅਤੇ container ਲਗਾਤਾਰ update ਹੋਣ ਵਾਲੀਆਂ master / LATEST version ਵਰਤਦੇ ਹਨ। release version ਅਤੇ ਹੋਰ environment ਲਈ download page ਵੇਖੋ। ਹੋਰ version ਅਤੇ environment
02
example download ਕਰੋ
example ZIP ਨੂੰ download ਅਤੇ extract ਕਰੋ। 01_elastic_hinge folder ਵਿੱਚ ਤਿੰਨ input file ਵਰਤੋ।
extract ਕੀਤੇ 01_elastic_hinge folder ਵਿੱਚ analysis ਚਲਾਓ। command line ਰਾਹੀਂ extract ਕਰਦੇ ਸਮੇਂ macOS ਅਤੇ Linux ਉੱਤੇ unzip ਵਰਤੋ।
01_elastic_hinge/
hecmw_ctrl.dat- input ਅਤੇ output file ਦੇ ਟਿਕਾਣੇ
hinge.cnt- material, load, restraint ਅਤੇ analysis setting
hinge.msh- hinge mesh
command line ਰਾਹੀਂ example ਤਿਆਰ ਕਰਨ ਲਈ, ਜਿੱਥੇ ਇਸਨੂੰ ਰੱਖਣਾ ਹੈ ਉੱਥੇ ਹੇਠਾਂ ਦਿੱਤਾ ਪੂਰਾ block ਚਲਾਓ। ਇਹ archive ਨੂੰ download ਅਤੇ extract ਕਰਦਾ ਹੈ ਅਤੇ ਫਿਰ example folder ਵਿੱਚ ਜਾਂਦਾ ਹੈ। ਉਸੇ terminal ਵਿੱਚ analysis command ਜਾਰੀ ਰੱਖਿਆ ਜਾ ਸਕਦਾ ਹੈ।
Windows / PowerShell
curl.exe -fL -o 01_elastic_hinge.zip https://www.frontistr.com/sys/files/01_elastic_hinge.zip
if ($LASTEXITCODE -eq 0) {
  Expand-Archive -Path 01_elastic_hinge.zip -DestinationPath . -ErrorAction Stop
  cd 01_elastic_hinge
}
macOS / Linux
curl -fL -o 01_elastic_hinge.zip https://www.frontistr.com/sys/files/01_elastic_hinge.zip &&
unzip 01_elastic_hinge.zip &&
cd 01_elastic_hinge
03
example folder ਤੋਂ ਚਲਾਓ
example folder 01_elastic_hinge ਵਿੱਚ analysis ਚਲਾਓ। ਯਕੀਨੀ ਬਣਾਓ ਕਿ hecmw_ctrl.dat ਉੱਥੇ ਮੌਜੂਦ ਹੈ।
Windows binary
example folder ਵਿੱਚ fistr1.exe ਨੂੰ double-click ਕਰੋ। ਨਾਲ ਦਿੱਤੀਆਂ DLL ਵੀ ਉਸੇ folder ਵਿੱਚ ਹੋਣੀਆਂ ਚਾਹੀਦੀਆਂ ਹਨ। ਚਲਾਉਣਾ ਮੁਕਣ ਤੇ window ਬੰਦ ਹੋ ਜਾਵੇ ਤਾਂ example folder ਵਿੱਚ ਬਣੇ result ParaView ਵਿੱਚ ਖੋਲ੍ਹੋ।
log ਵੇਖਣ ਲਈ
window ਤੁਰੰਤ ਬੰਦ ਹੋ ਜਾਵੇ ਅਤੇ result ਨਾ ਬਣੇ, ਜਾਂ log ਵੇਖਣਾ ਹੋਵੇ, ਤਾਂ example folder ਵਿੱਚ PowerShell ਖੋਲ੍ਹ ਕੇ ਹੇਠਾਂ ਦਿੱਤਾ ਚਲਾਓ:
.\fistr1.exeDocker (Windows / macOS / Linux)
docker run --rm --platform linux/amd64 -v "${PWD}:/work" -w /work registry.gitlab.com/frontistr-commons/frontistr/fistr1:master fistr1example folder ਵਿੱਚ terminal ਖੋਲ੍ਹੋ (Windows ਉੱਤੇ PowerShell) ਅਤੇ command ਚਲਾਓ। example folder container ਦੇ /work ਉੱਤੇ mount ਹੁੰਦਾ ਹੈ। result ਤੁਹਾਡੇ local example folder ਵਿੱਚ save ਹੁੰਦੇ ਹਨ।
terminal ਵਿੱਚ ਚਲਾਉਂਦੇ ਸਮੇਂ log ਦੇ ਅੰਤ ਉੱਤੇ ਹੇਠਾਂ ਦਿੱਤਾ message ਦਿਖੇ ਤਾਂ analysis ਪੂਰੀ ਹੋ ਗਈ ਹੈ। ਲੱਗਣ ਵਾਲਾ ਸਮਾਂ ਤੁਹਾਡੇ PC ਉੱਤੇ ਨਿਰਭਰ ਹੈ।
FrontISTR Completed !!ਜੇ ਕੁਝ ਠੀਕ ਨਾ ਚੱਲੇ
input file ਨਾ ਮਿਲੇ ਤਾਂ ਵੇਖੋ ਕਿ analysis 01_elastic_hinge folder ਤੋਂ ਚਲਾ ਰਹੇ ਹੋ। Windows ਉੱਤੇ ਇਹ ਵੀ ਵੇਖੋ ਕਿ fistr1.exe ਅਤੇ ਸਾਰੀਆਂ DLL ਉਸੇ folder ਵਿੱਚ copy ਕੀਤੀਆਂ ਗਈਆਂ ਹਨ।
04
ParaView ਵਿੱਚ ਨਤੀਜਾ ਖੋਲ੍ਹੋ
ParaView install ਕਰੋ। File → Open ਚੁਣੋ ਅਤੇ example folder ਵਿੱਚ ਹੇਠਾਂ ਦਿੱਤੀ file ਖੋਲ੍ਹੋ।
hinge_vis_psf.0001.pvturesult ਉਸੇ 01_elastic_hinge folder ਵਿੱਚ ਲਿਖੇ ਜਾਂਦੇ ਹਨ। ਨਾਲ ਵਾਲਾ hinge_vis_psf.0001 folder ਵੀ ਲੋੜੀਂਦਾ ਹੈ, ਇਸ ਲਈ .pvtu file ਨੂੰ ਇਕੱਲੀ ਨਾ ਹਿਲਾਓ। 0000 ਸ਼ੁਰੂਆਤੀ ਹਾਲਤ ਹੈ ਅਤੇ 0001 load ਲੱਗਣ ਤੋਂ ਬਾਅਦ ਦਾ result ਹੈ।
ਸਕ੍ਰੀਨ ਉਦਾਹਰਨ: macOS ਉੱਤੇ ParaView 6.1.0। ਮੁੱਢਲੇ ਕਦਮ Windows ਅਤੇ Linux ਉੱਤੇ ਵੀ ਇੱਕੋ ਹਨ।
-
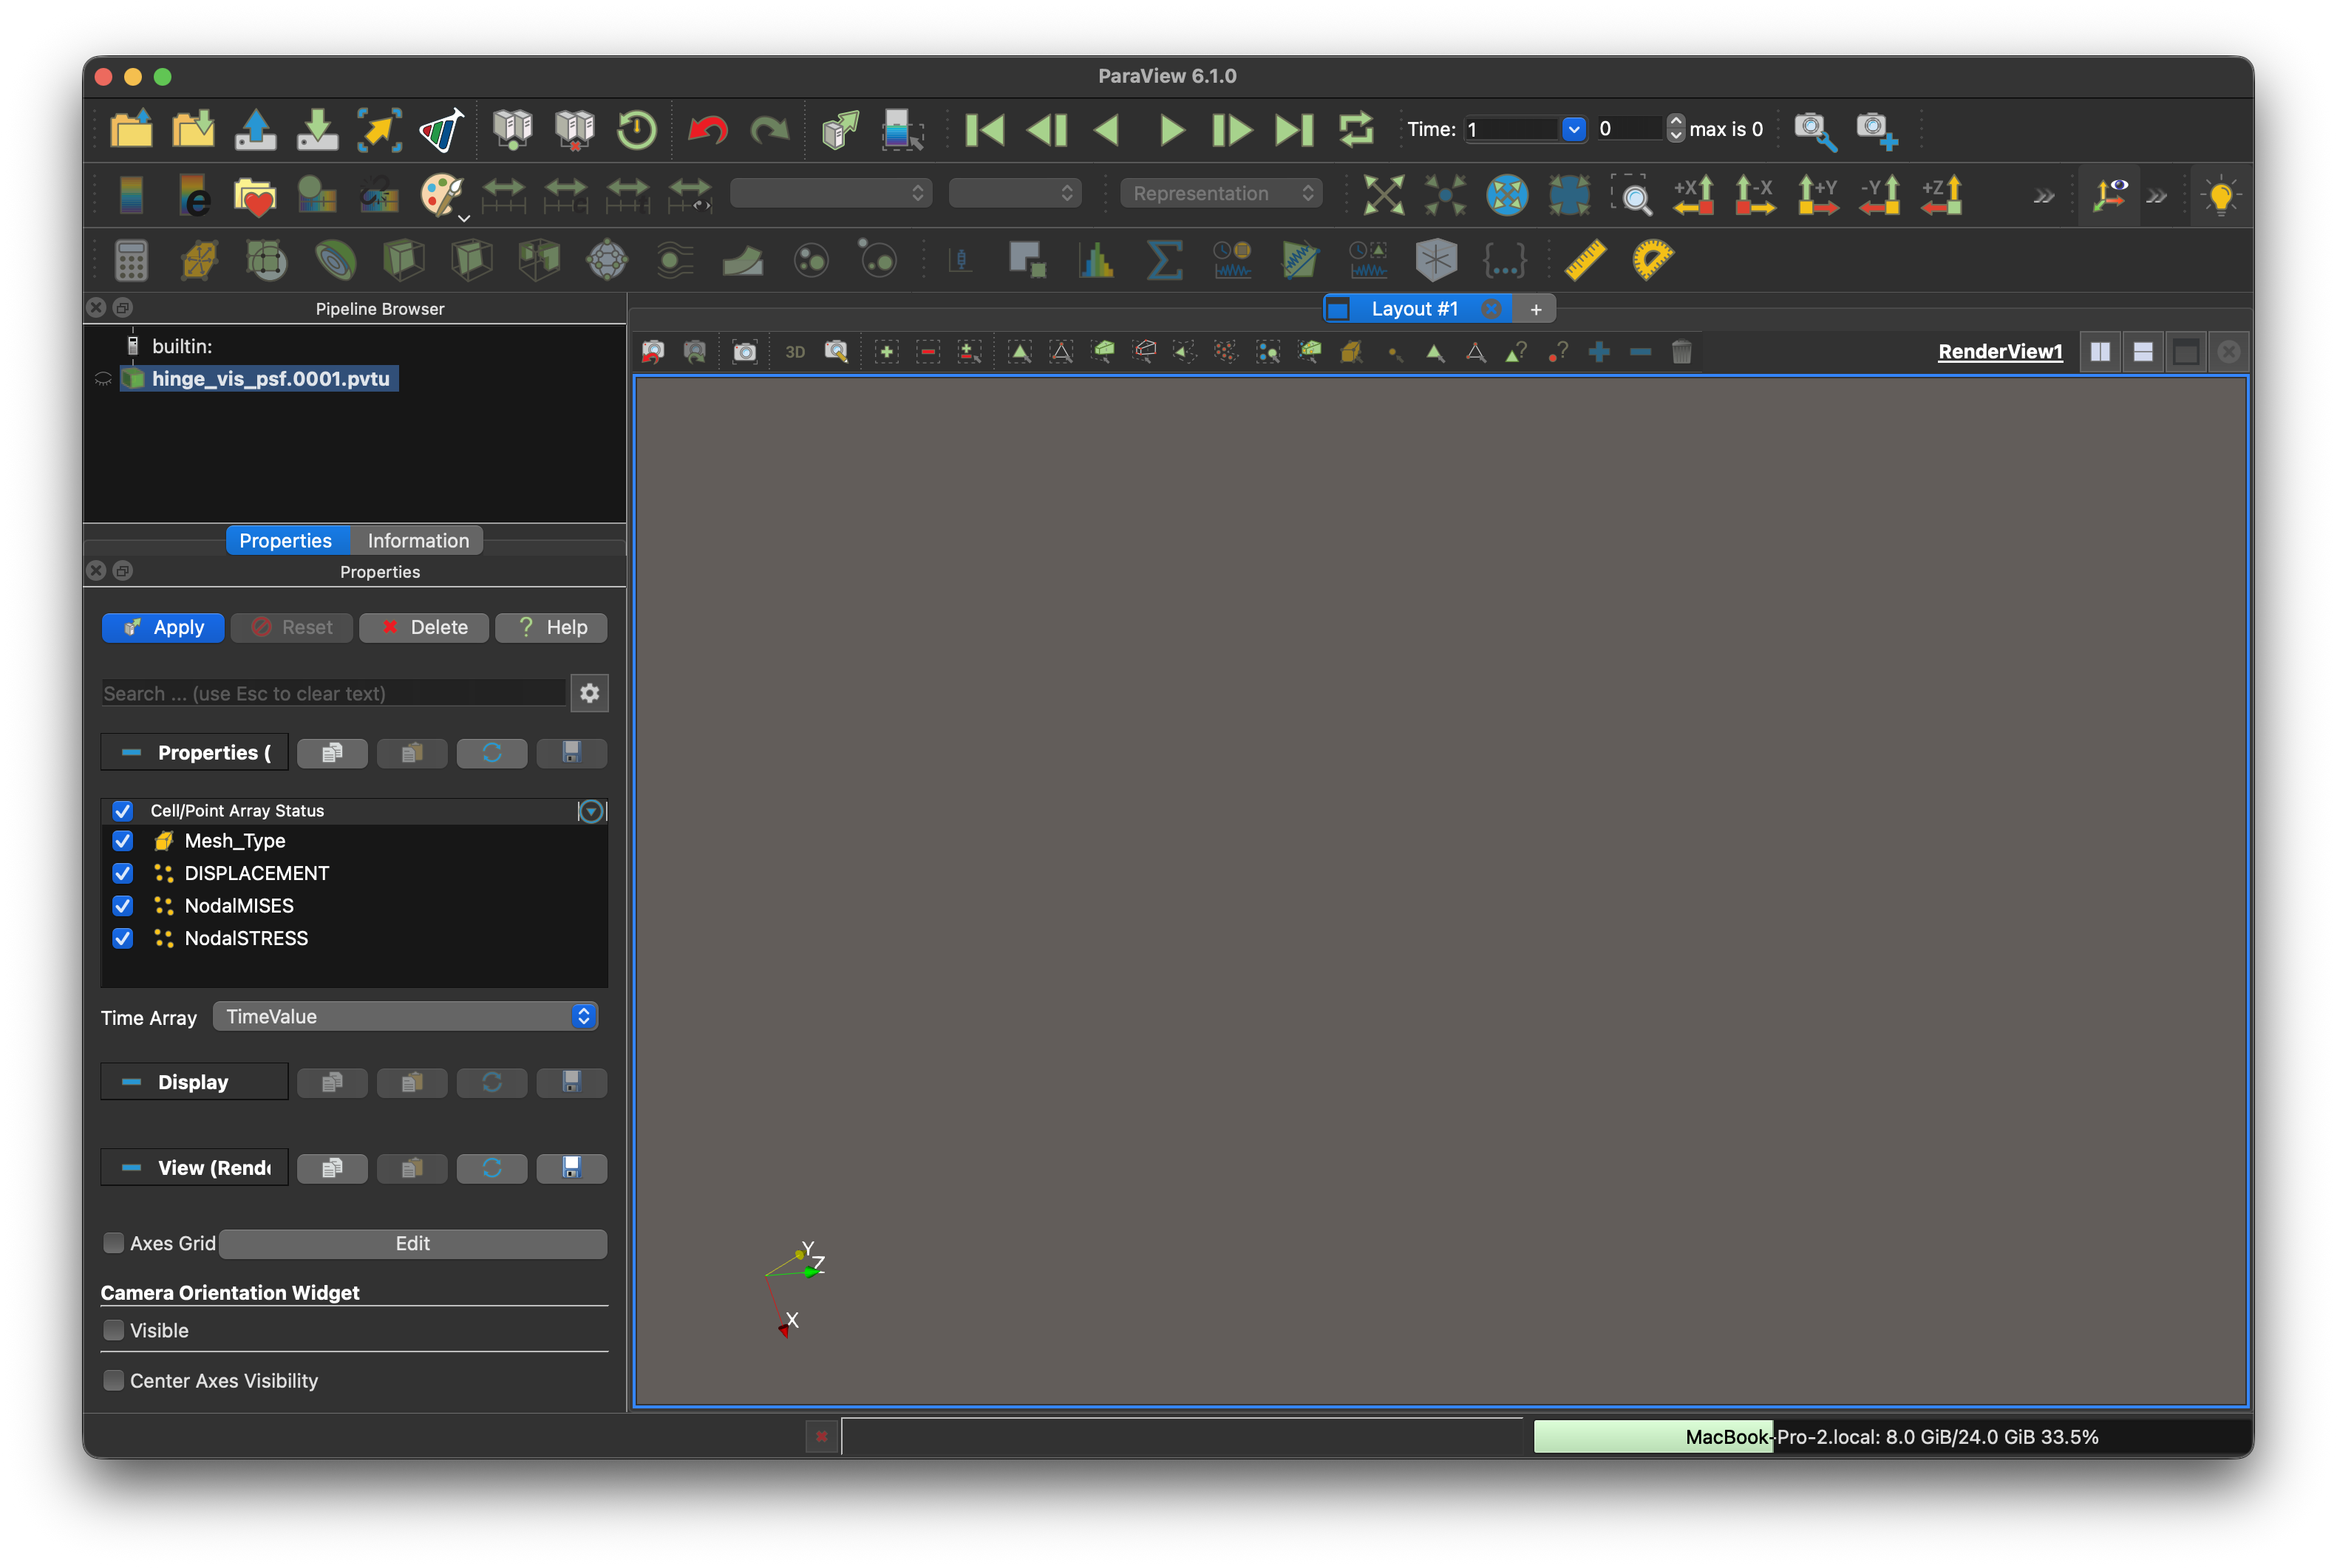
04 / 1
file ਖੋਲ੍ਹਣ ਤੋਂ ਤੁਰੰਤ ਬਾਅਦ ਦਾ ਦ੍ਰਿਸ਼। ਖੱਬੇ ਪਾਸੇ Apply ਉੱਤੇ click ਕਰੋ।
-
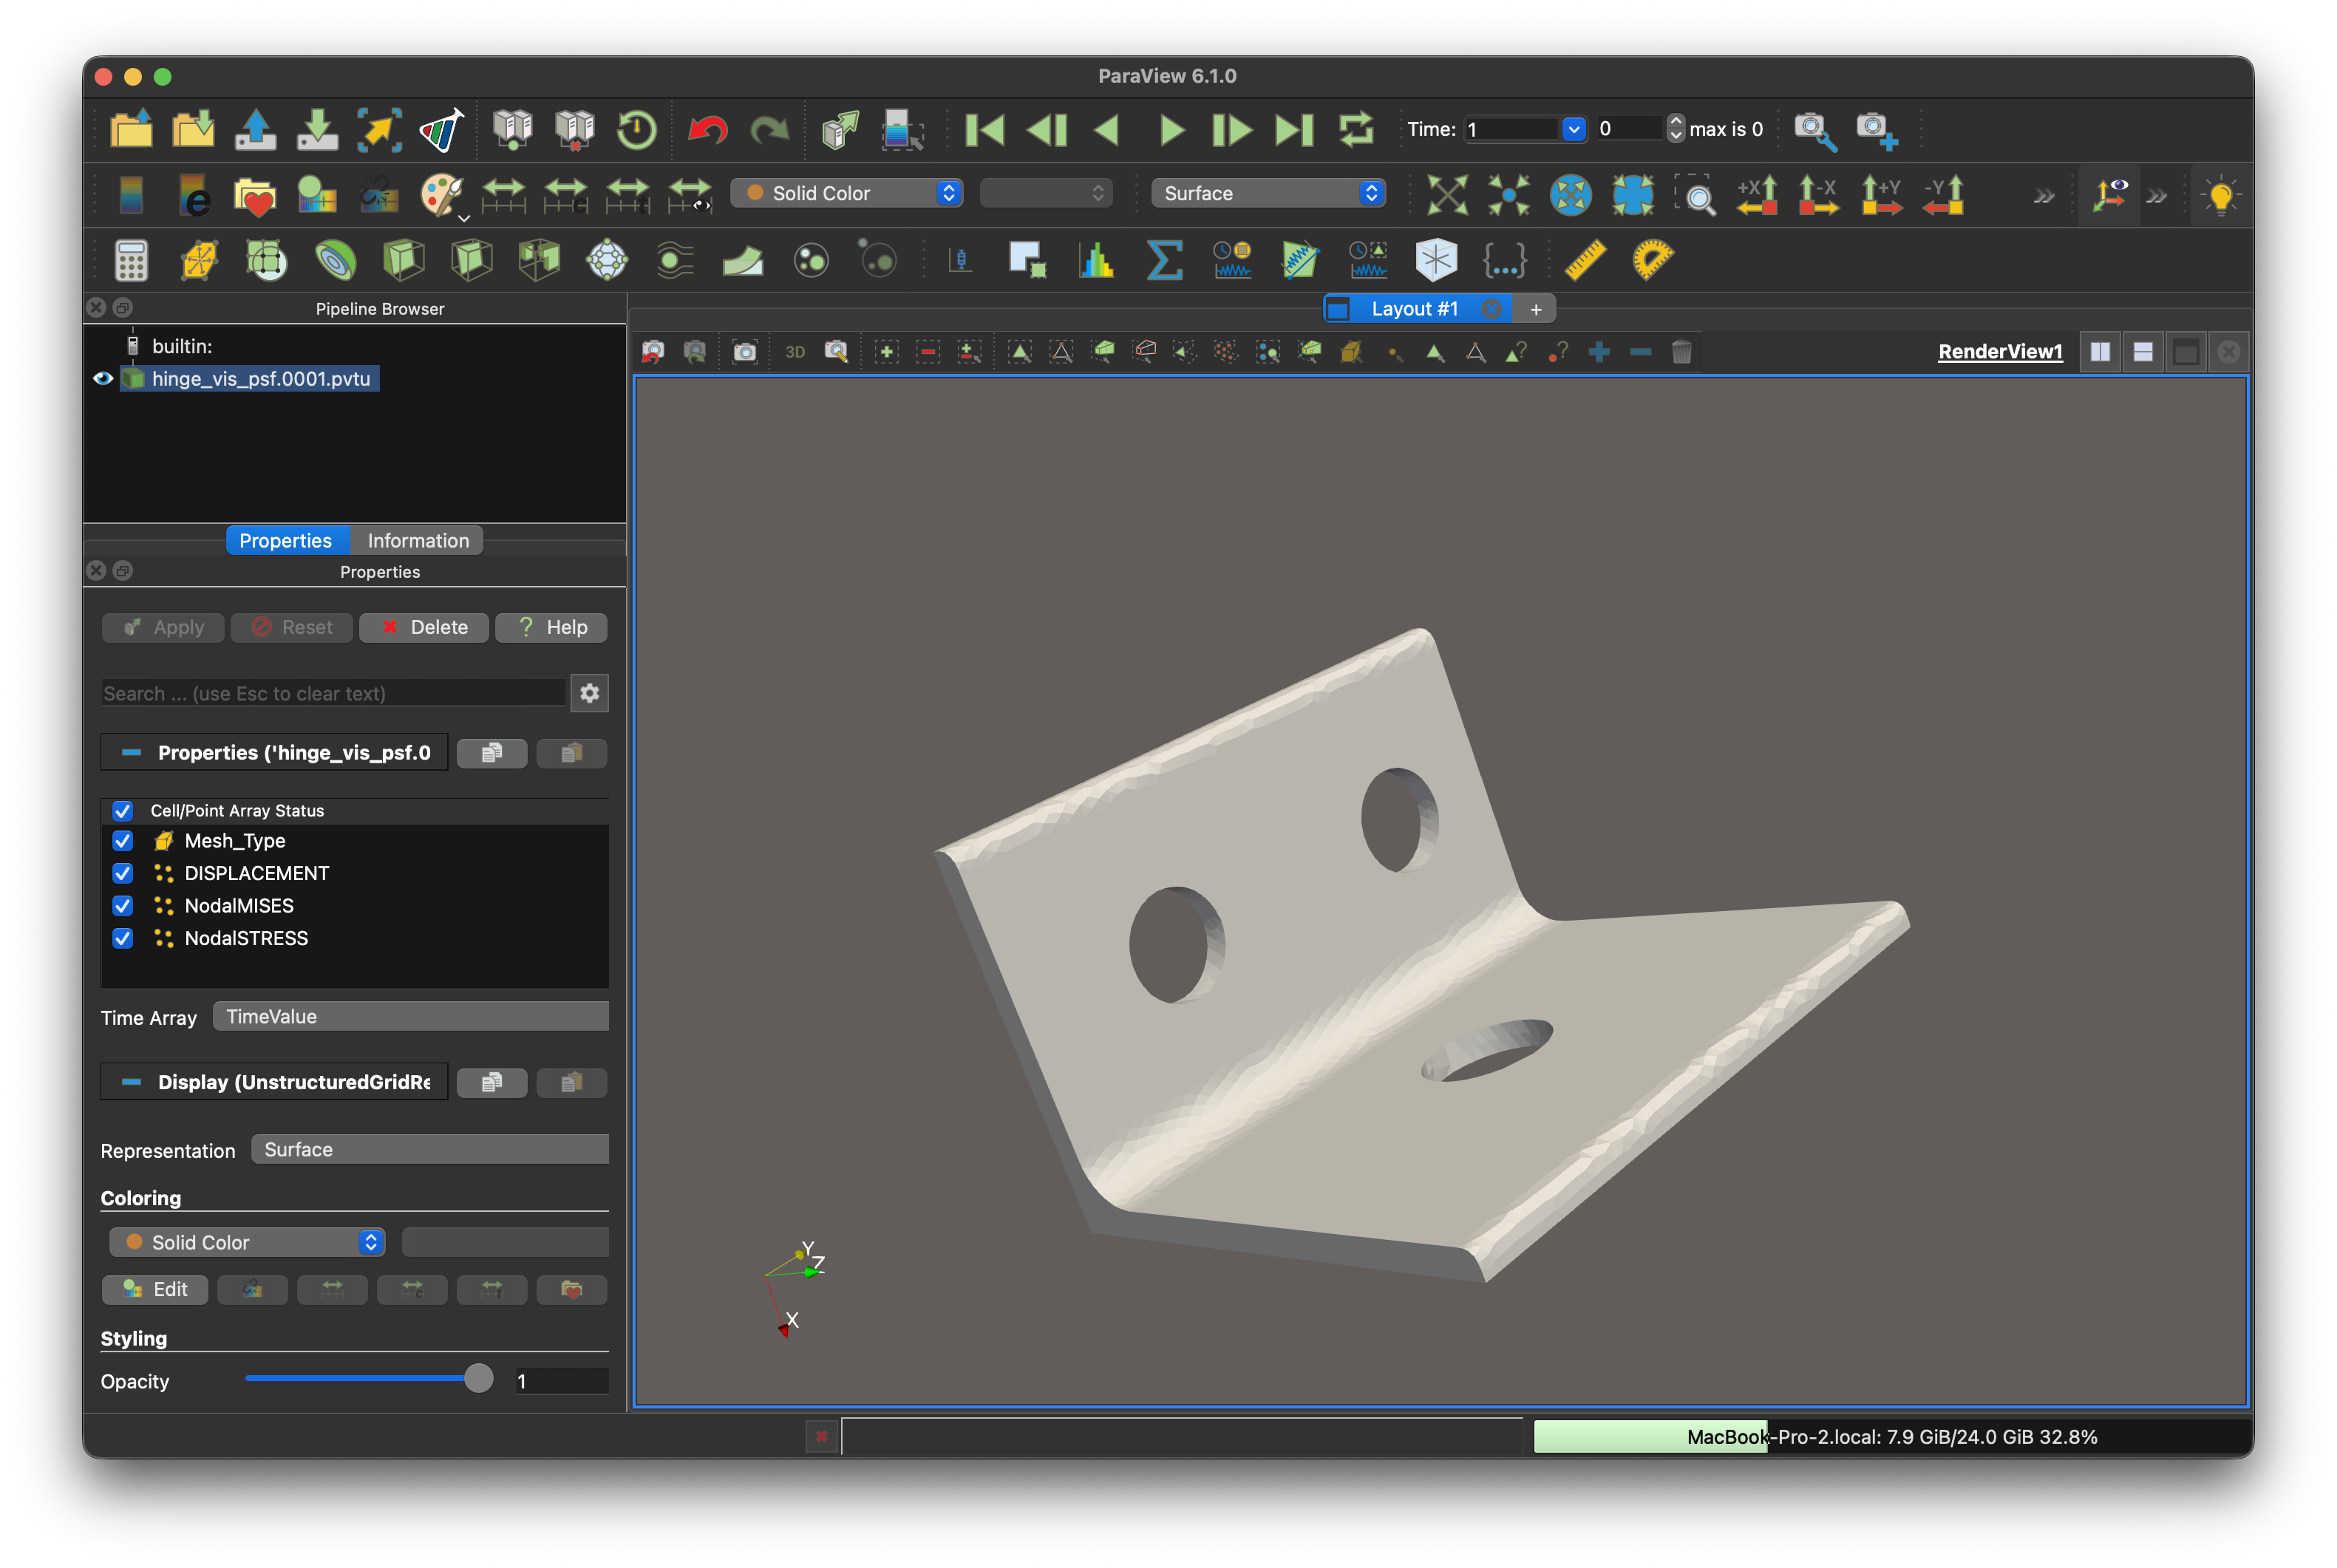
04 / 2
Apply ਉੱਤੇ click ਕਰਨ ਤੋਂ ਬਾਅਦ ਕਬਜ਼ੇ ਦੀ geometry ਦਿਖਦੀ ਹੈ।
-
04 / 3
ਉੱਪਰਲੇ toolbar ਵਿੱਚ Solid Color ਨੂੰ NodalMISES ਕਰੋ ਤਾਂ von Mises ਤਣਾਅ ਦੀ ਵੰਡ ਦਿਖੇਗੀ।
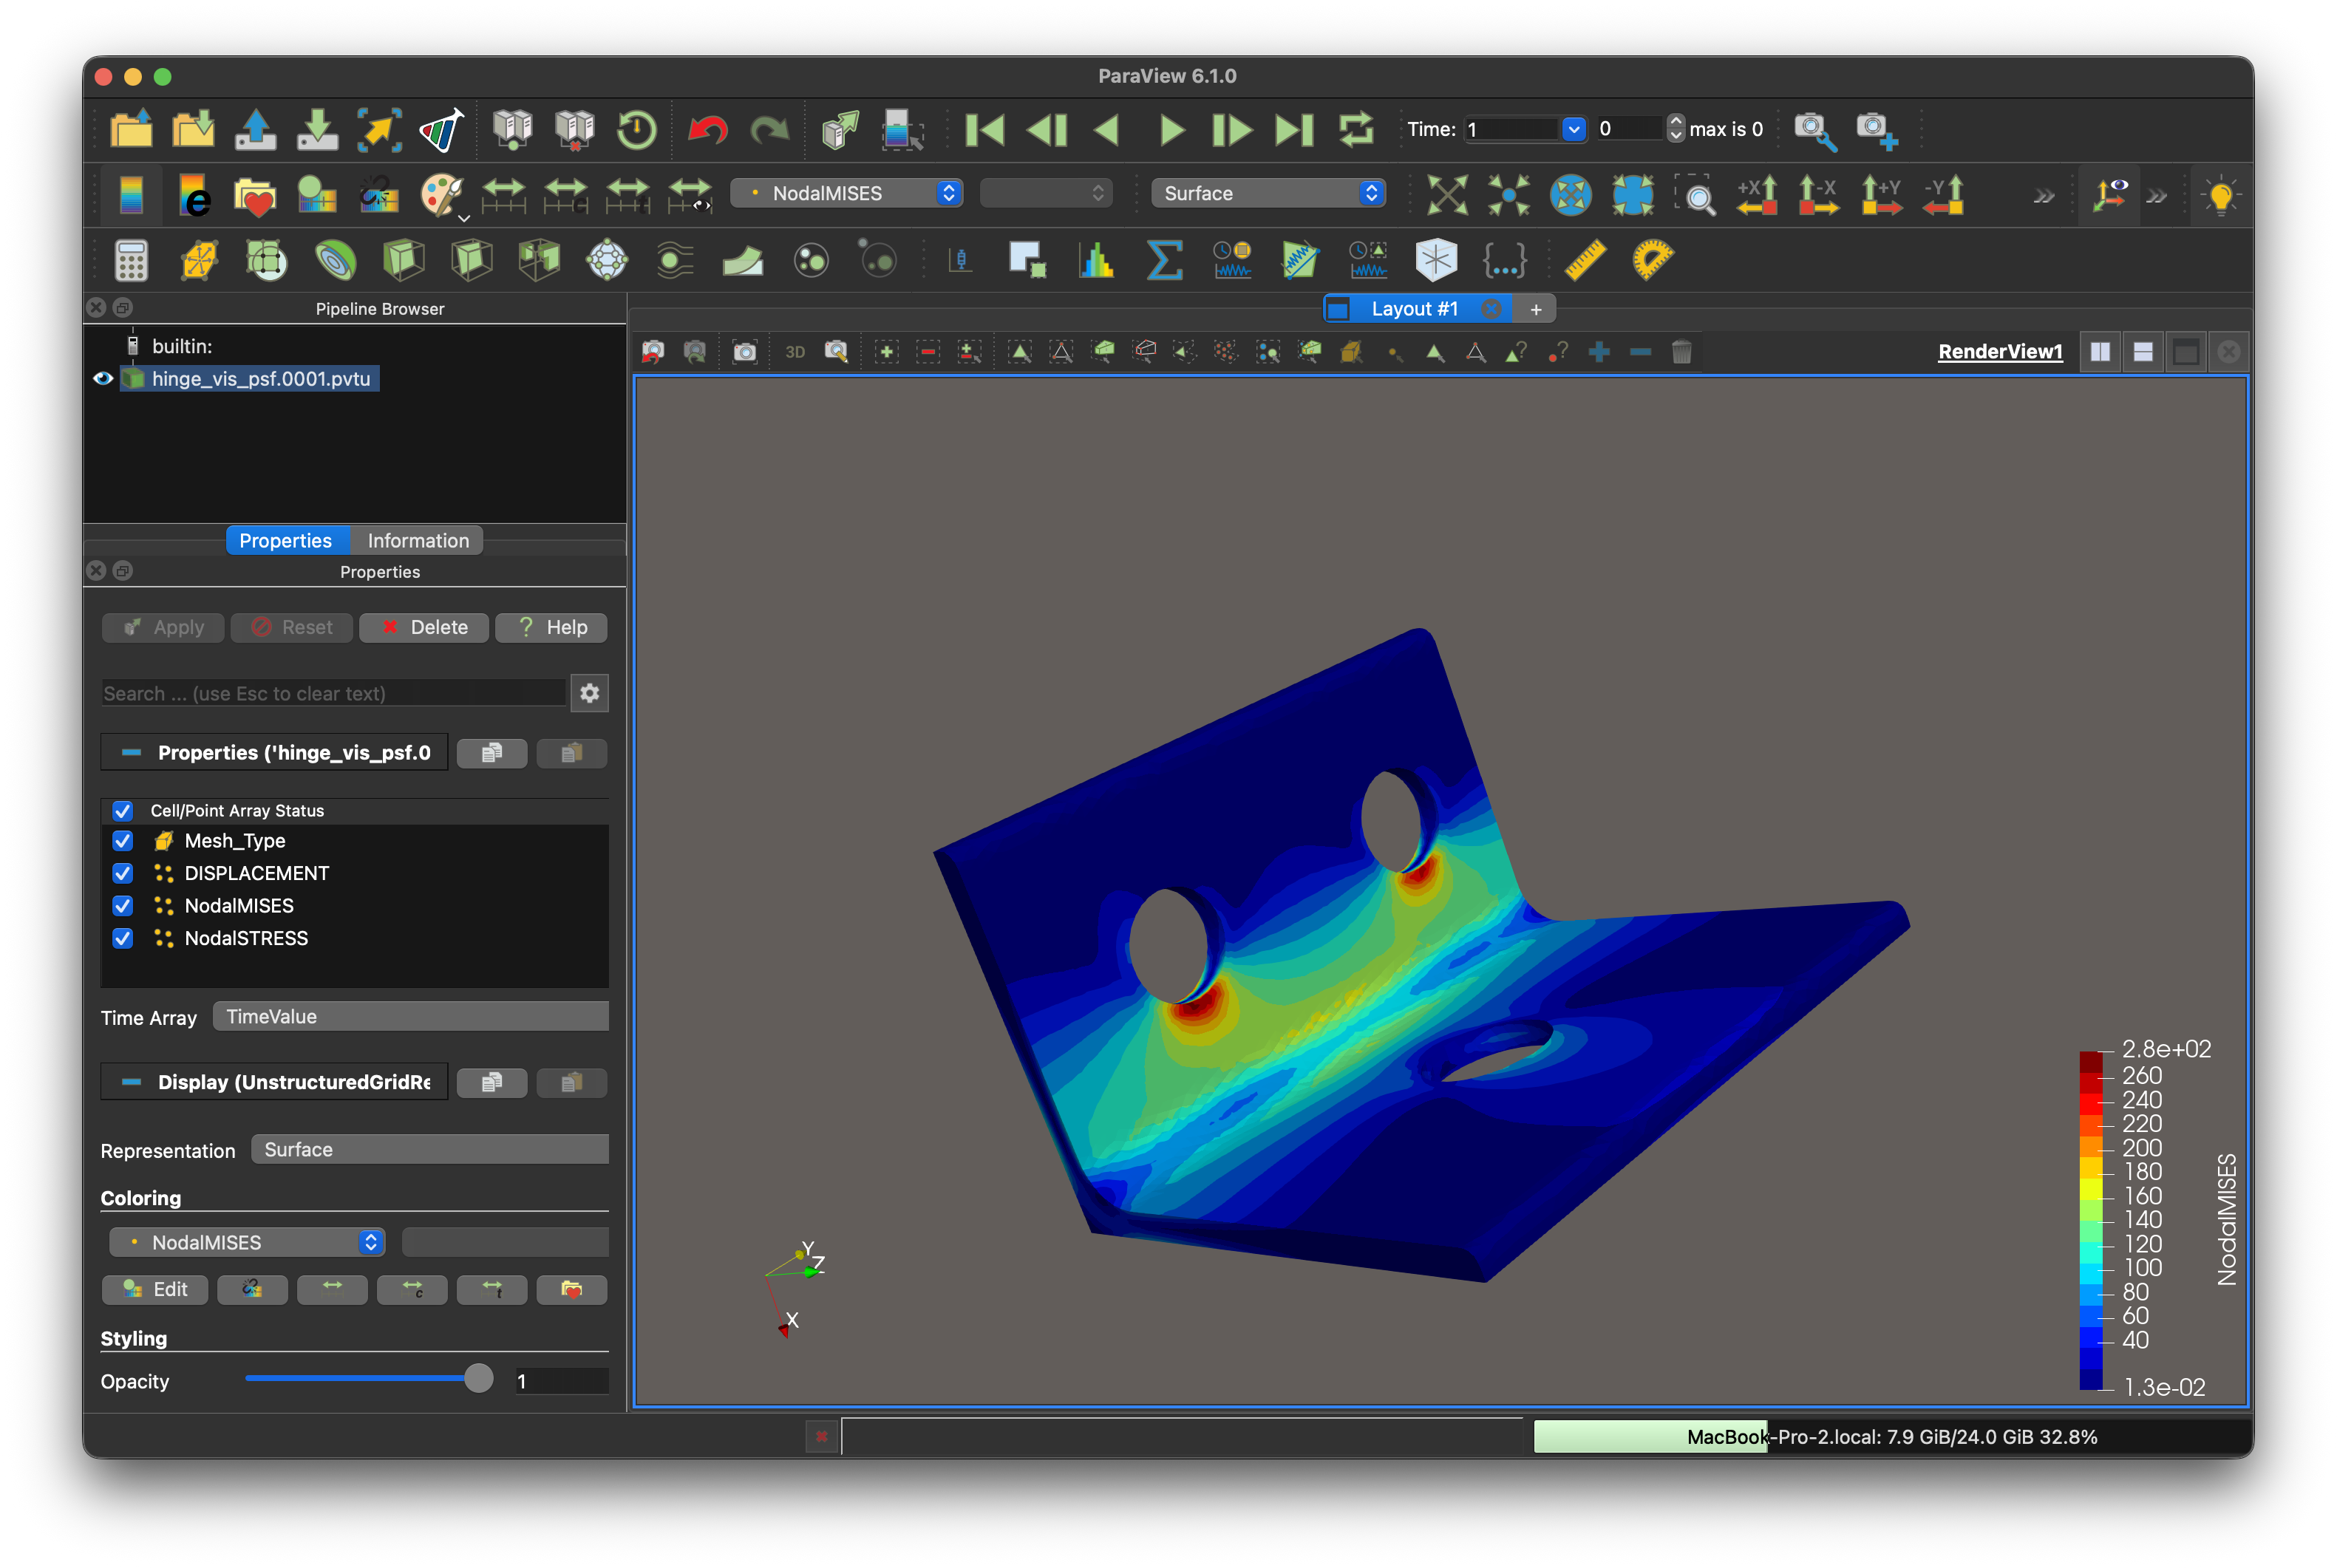
ਰੰਗ ਅਤੇ background ParaView settings ਮੁਤਾਬਕ ਵੱਖਰੇ ਹੋ ਸਕਦੇ ਹਨ; example ਚਿੱਤਰ ਵਰਗੇ ਹੋਣ ਦੀ ਲੋੜ ਨਹੀਂ। model ਨਾ ਦਿਖੇ ਤਾਂ Reset Camera ਅਜ਼ਮਾਓ।
ਤੁਹਾਡੀ ਪਹਿਲੀ analysis ਪੂਰੀ ਹੋ ਗਈ ਹੈ
ਅੱਗੇ example ਵਿੱਚ load ਅਤੇ material settings ਵੇਖੋ। manual ਇਸ model ਨੂੰ ਸਮਝਾਉਂਦਾ ਹੈ ਅਤੇ ਹੋਰ analysis type ਪੇਸ਼ ਕਰਦਾ ਹੈ।